Showing posts with label interior design. Show all posts

Monday, February 24, 2014

Off Grid Living: Bus Houses!

Ever since this whole economic crash and teenage peer pressure business started (which was around the same time for me) I've thought it'd be really convenient to live like a hermit in the middle of nowhere, where I wouldn't have to deal with money or humans. I don't much like humans; they creep me out.

It was a bit more recently that I found out about the trend of converting old buses into homes. What could be cooler than living in an old bus? It's cheap, cozy, green, and pretty damn unique. Also you could totally drive your house down the street, were you so inclined. Whee!

Here are a few cool pictures that I pilfered from the internet:


Not gonna fit. :(
So with that, I thought I'd try my hand at designing one of my own. Not in real life, though; it's midterm season so I wouldn't have the time. But that's what CAD modelling is for! If I do say so myself, I think I managed to make a pretty cool off-grid home. I'd seriously consider making the real thing and moving in, but then I realized that there's no way I could find room for my bass.

I built with self-sufficiency yet simplicity in mind. Note the solar panels and veggie gardens. I aimed to keep the gardens compact, to create a plot of land that could fit in an country, suburban, or even urban location. I wouldn't mind hermit-ing in a city, either; there it's acceptable to just ignore everybody else.

Overview from above.

The front yard.

A cozy little nook for reading, writing, and dining. 

The living room and kitchen, as viewed from the doorway. 

The living room, as viewed from the kitchen.
The bathroom. 
The bedroom.
The backyard: a shady orchard with a gazebo. 


The floor plan. 


Sunday, December 16, 2012

Mmm... Smells Like Christmas

With this year's rather disappointing lack of snow in my region, I've been looking for seasonal idea's to make up for it's lacking--in steampunk style, of course, since I'm crazy and obsessed. After a bit of derping around  on the aetherwebs, I've found these insanely simple instructions for these Victorian-ish clementine and clove pomanders on (of all embarrassingly un-steampunk places) Good Housekeeping's website.

Wednesday, October 3, 2012

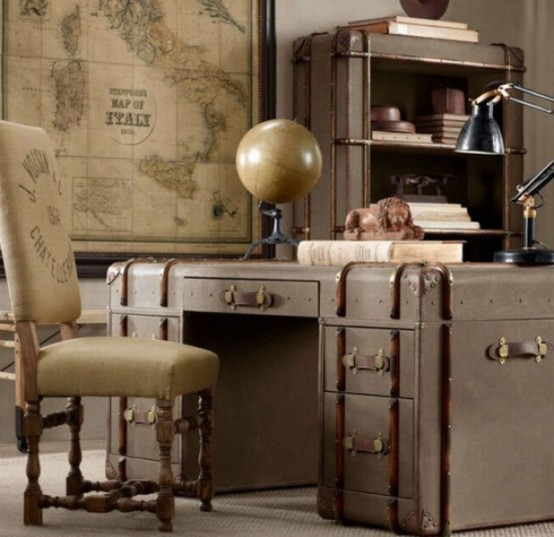
Home Office Designs

I really can't think of much to say about these steampunk office designs other than that they're really, really awesome. *sigh* If only I could have an office like this... But then, I'd probably never get anything done.

Monday, September 24, 2012

Industrial-styled Lamp Made From Old Books

This picture isn't mine. Please don't sue me. 
I'm not sure I could bring myself to destroy a stack of books like this, even for the sake of art, but I have to admit that this tutorial looks pretty cool and remarkably easy.

Thursday, August 30, 2012

Monday, August 27, 2012

Easy Mini Top Hat Tutorial

 Having received a surprise invitation to a convention in less than a month, I found myself in need of something outrageous and awesome to wear, and fast. So of course I went for a mini top hat.
I ended up getting caught up in the creation process and taking fewer pictures than I should have, so please let me know if this makes no sense.

You will need: An empty cereal box
                       A disposable cup
                       A hot glue gun
                       Some fabric (I up-cycled from an old shirt)
                       A ribbon


1. Cut two circles, about 1.5 inches larger in diameter than the disposable cup. Glue the two circles together to make a sturdy base for the top hat.


2. Cut a piece of fabric around the cardboard circle. Place the cardboard in the center and fold in the fabric so it wraps around both sides of the cardboard, with the gathering point in the middle. Glue it into place.


3. Trace the open end of the cup onto the cardboard. Cut out the resulting circle and cover it with fabric using the same method as in the base.


4. Cut a large rectangular piece of fabric and wrap it around the cup so that the sides are covered. Glue the bottom of the fabric-wrapped cup to the top of the base.


5. Glue on the top portion of the hat. Tie a ribbon around the point where the base and cup meet to hide any drippings of glue, and, if desired, adorn it with feathers, pins, or whatever else you'd like.

6. Glue it to a headband, ribbon, hair clip, etc, to keep it securely in place. It also makes a nice decoration for a steampunk-themed room.


Monday, August 6, 2012

Pulley-Operated Curtains


            This is an idea I came up with after getting sick of trying to keep track of curtain ties. It’s really quite simple to set up, and it greatly eases the complications that come with flowing, Victorian-style curtains.


1.Hang up your curtains normally.
2. Affix three fairly sturdy nails evenly spaced a few inches above the window, putting the middle nail slightly higher than the other two.
3.Hang a double pulley from the  middle nail.
4. Cut two very long (about seven ft.) pieces of string. Tie a small loop on each end.
5. Attach one end of a string to the back of the curtain, about halfway down the window. I used safety pins, but sewing would probably look more professional. Do this for both sides.
6. Thread each string over the nail on its side and through the pulley, so both hang down in the center of the window. The ends of the ropes should reach a few inches above the bottom of the window.
7. Affix another nail about four inches below the bottom window, positioned so that it lines up with the pulley and the dangling ropes.
8. To open your curtains, pull down your ropes and hook the looped ends around the bottom nail.  

Thursday, June 28, 2012

Tire Recycling


            While I was in Detroit, my group’s duties included picking up tires from various alleyways in the city. We came back with a semi-truck full.

            As part of Cass’s Green Industries, the tires were cut into strips and woven into rubber mats, which is what I spent that afternoon doing. While, for numerous reasons, I can’t post a tutorial on how to make them, I thought this was an interesting sort of upcycling that might be of interest.

Saturday, June 16, 2012

Green + Wired Smart Home


            After a recent trip to Chicago’s Museum of Science and Industry, I’ve returned with all manner of potential blog material, so this may turn into the Museum of Science and Industry Blog for a little while.
            At first glance, green and steampunk might not go together. I mean, really, belching smokestacks, massive factories, and air filled with London-esque smog? But on the other hand, the modern steampunk lifestyle—self-sufficiency, upcycling, and frugality—might be a bit more eco-friendly.
            While the museum’s Smart Home exhibit might be a bit too plain and modernist to fit the look, it certainly has some steamy details. First off: the gardens. Personally I think that growing one’s own food is about as DIY as it gets, and the gardens surrounding the house are filled with fruits, vegetables, and herbs, some around the house, some literally growing on the walls, and some in hydroponics systems.
            Inside, it includes cutting-edge technology, like automated window shades, a smart telescope, and bathroom mirrors that surf the web (in case you’re really addicted to Facebook?). Most of it, being digital, would be better categorized as cyberpunk, but a little genre mixing is fine by me.
            The real steam comes in the furniture, most of which is from reclaimed industrial or vintage pieces. Old filing cabinets and all manner of old knickknacks and so forth sit inside with the postmodern architecture. Sadly, I couldn’t get any interior pictures, but you could find some at the official site.
            In other announcements, I’ll be gone for the next week or so and probably won’t have internet access, but I’ll be sure to post about my travels when I get back.