Showing posts with label style. Show all posts

Monday, October 1, 2012

Skirt to Top Tutorial

I've had this skirt sitting around and collecting dust for a couple years, so I finally decided to do something with it. This was pieced together in a rather improvised fashion, with numerous mistakes, so please let me know if this tutorial makes no sense.


1. I started with an ankle-length velvet pencil skirt. It wasn’t exactly ugly, but it certainly wasn’t unique or steampunk. This needed to be fixed.

2. Cut the bottom third off the skirt. Hem the rough edges on the front, but keep the back as is for now.

3. Cut two strips of fabric, each about sixteen inches long, from the cut off bottom portion of the skirt. Hem all rough edges to make straps.

4.Sew the straps onto the waistband of the skirt. Trim the straps and the front of the waistband with lace.

5. Cut two pieces of fabric, each about 2x16 inches, and sew along the edges to make two long tubes. Sew these to the side of the top to make ties.

6. Take the remaining fabric and sew it to the back of the skirt, making pleats as you go. To make pleats, pinch the fabric, fold it over, and sew down the crease. 


Thursday, August 23, 2012

Surprise Steampunk Fashion!

I came across these banners while waiting at the Keflavic International Airport in Iceland. I'm not quite sure what the steampunk theme has to do with the airport, but I'm not complaining, certainly.


Monday, August 6, 2012

Pulley-Operated Curtains


            This is an idea I came up with after getting sick of trying to keep track of curtain ties. It’s really quite simple to set up, and it greatly eases the complications that come with flowing, Victorian-style curtains.


1.Hang up your curtains normally.
2. Affix three fairly sturdy nails evenly spaced a few inches above the window, putting the middle nail slightly higher than the other two.
3.Hang a double pulley from the  middle nail.
4. Cut two very long (about seven ft.) pieces of string. Tie a small loop on each end.
5. Attach one end of a string to the back of the curtain, about halfway down the window. I used safety pins, but sewing would probably look more professional. Do this for both sides.
6. Thread each string over the nail on its side and through the pulley, so both hang down in the center of the window. The ends of the ropes should reach a few inches above the bottom of the window.
7. Affix another nail about four inches below the bottom window, positioned so that it lines up with the pulley and the dangling ropes.
8. To open your curtains, pull down your ropes and hook the looped ends around the bottom nail.  

Thursday, August 2, 2012

T-shirt to Tank Top Tutorial 2

A bit more complicated than the last one, but very cool, and I think the braid in the back is quite steampunk-looking. 


Tuesday, June 26, 2012

Ribbon Choker Tutorial


            So since I was gone all last week, I’m doing more posts than usual for a little while. Here’s a tutorial for a basic choker made from a ribbon. I like to think of this as the neo-Victorian equivalent of the punk dog collar. It’s quite versatile and looks great when layered with a pendant or longer necklace.

1. Cut a piece of ribbon about two inches longer than the circumference of your neck.
2. Fold over the end of the ribbon. 

3. Push down on the fold to make two flaps

4. Sew it down, making sure to leave the two flaps separate. Iron them flat.
5. Repeat steps two through four on the other end.
6. Place the two hook clasps between the flaps on one end and hand sew into place. Repeat on the other end with the eyes.
7. Sew on any ornamentation, beads, etc, if desired. 
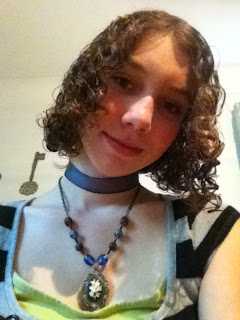
Here's a finished one, layered with a cameo necklace.